A Spot of Baking

“This is rather therapeutic”, I thought to myself as I *properly* greased and base-lined a cake tin. As a busy mum of two who generally speed-bakes Victoria sandwiches, my usual method is to rip a bit of greaseproof paper off the roll and jam it into the tin, using the weight of the cake mixture to keep it in there. Cake doesn’t last long in our house, especially now that my youngest child, with a limited vocabulary, has learned the word ‘CAKE!’ along with vehement pointing! I’m no show baker either, so the odd few creased edges don’t matter. It was quite nice though to cut out a circle, stick it in there with a bit of marg smeared on the bottom of my loose-bottomed tin, and then cut strips and stick them around the edge. The children were playing nicely together (for once) and not clamouring to help or attempting to eat massive spoonfuls of raw egg-laden batter. I filled the tin with cake mixture (https://www.bbcgoodfood.com/recipes/11695/raspberry-bakewell-cake to be exact, although I substituted jam for the fresh raspberries) and popped in the oven.

My bliss was short-lived however, as I started on the shortbread. As soon as I started up the mixer I was showered with sugar. By the time I wiped down surfaces, dumped a little extra in the bowl to make up for the shortfall, and then got a mop to clean the floor, my feet were beginning to find themselves glued to the floor. By this point the children had gravitated out to the garden, I was beginning to make their tea, watch the cake already in the oven and, erm, yeah, that’s enough to be doing in one go. As I gently squashed the shortbread into the tin (this time the greaseproof paper was just rammed in there, no time now for cutting out bits of paper!), I heard some commotion outside. I was greeted by the sight of my older child sprinkling handfuls of compost over my younger child’s head. Her hair and clothes were full of grainy little bits that wouldn’t simply brush away. I ordered them in, attempting to remove as much soil as possible. A small black trail was left in their wake, all the way down the hallway…

The cake tastes great though!

Slow Roasted Leg of Mutton

Here it is, our first taste of our own roast mutton, in all it’s glory. Well worth waiting for.

Choose a good joint, not too fatty, but a bit of marbling is good. Both leg and shoulder joints will benefit from slow roasting, you can do them both with this method. Weigh the joint first, you need to cook it for about 40 minutes per 450g at 150C. This monster took 4 hours.

Pop the joint in a roasting pan (ideally a lidded one, but foil will do if you don’t have a pan with a lid). Add a sprig of rosemary, and if you like, make a few slits in the meat and stuff with a couple of cloves of garlic. Pour about 250ml of red wine over the meat (I didn’t have any so used dark ale), cover, and roast for the required time.

Bring it out and left it rest for about half an hour before carving. The juices make amazing gravy, I put the roasting pan on the hob, added some gravy granules and brought to the boil until it thickened. There was a bit of clear fat resting on the top of the gravy but I poured most of it away and mixed the rest in. The alcohol gives the gravy a really nice flavour.

My dad declared it ‘very nice’, my mum and I decided we preferred it over lamb, and my husband, who when we met only ate chicken and sausages, had thirds.

This is what was left, and I am taking a break from turning it into a meat and potato pie to write this!

Bacon-wrapped Fish Fingers

20160920_193850

My husband dislikes fish, but as it’s healthy and I’d like our son to have a varied diet, I insist on feeding them both fish at least once a month. It seems that fish wrapped in bacon is acceptable to all parties. I suspect most men would eat just about anything if it was wrapped in bacon. DH has made these 2 or 3 times so far, I have yet to actually make them! Easy peasy recipe, here it is:

White fish (if using frozen fish, defrost before use) allow 1 fillet per person

Streaky bacon – about 3 rashers per person

Cut the fish into about 3 strips per fillet – or into as many strips as you have slices of bacon! Wrap 1 slice of bacon around each strip of fish, and place onto a baking sheet lined with foil. The foil just makes cleaning up a bit easier. Pop into the oven for 20 minutes at 180°C. If you like your bacon a bit crispier, put them under the grill or in the frying pan for a few minutes to finish off.

Very tasty, and men and children appear to like them!!

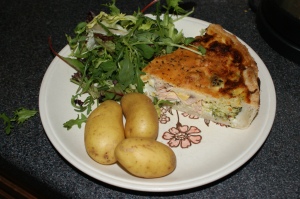
Salmon & Broccoli Quiche

SONY DSC

They look impressive, taste amazing, and actually don’t take that many ingredients. Quiches are great served hot, nice and comforting with fried potatoes and baked beans, or cold, as a snack or picnic item. Up to this point I had only ever made Quiche Lorraine, the most common type, with bacon, onion and cheese. I decided to try a slightly different twist this time.

For the pastry:

8 oz plain flour

4 oz fat (I use 1/2 butter, 1/2 lard)

a little cold water

Rub the fat into the flour in a bowl (or throw it in the blender, makes life easier, and the colder you keep it, the better the pastry comes out). Add water, a little at a time, mixing all the while with a knife. As soon as it starts to form a ball, stop with the water. You need it to come together without it getting sticky. Wrap it in cling film and pop it in the fridge while you prepare the filling.

For the filling:

2 salmon fillets

about 1/4 of a head of broccoli

1 small onion

1 pt milk

4 eggs

grated cheese

Bake the salmon according to the instructions, about 20 minutes should do it. I used frozen for this, but personally I don’t think I will ever buy the stuff again, it was quite dry. Once cooked, break into small bite-sized pieces.

Cut the broccoli into small bite-sized pieces. Boil or steam for a few minutes until it just starts to soften. You don’t want it completely cooked as it will cook further when you bake the quiche. Drain.

Dice the onion and fry until it softens and turns golden.

Now take the pastry out of the fridge, roll out on a well-floured surface and line a flan dish with it. Mine is 10″, this gives 4 generous portions. Don’t worry if yours is slightly bigger or smaller, you adjust the amount of egg mixture you need to fill it. I place my flan dish on a baking tray to catch any spills while it’s baking, and it means you don’t end up with a mess in the oven! Spread the salmon, broccoli and onion out in the pastry-lined dish. Now for the egg mixture. You may want to mix it up a little at a time, so you don’t end up with any left over. The ratio is 1 egg to 1/4 pint of milk. Whisk up the eggs and milk and pour over the filling, until it doesn’t quite reach the top of the pastry. If you like you can sprinkle a little grated cheese on top too. Bake at 180°C for about half an hour, until the filling has set and the pastry is golden brown.

You can put whatever you like in a quiche really, try asparagus or peas instead of broccoli; ham, mushroom and cheese, or go for my favourite, the traditional bacon and onion.

Pancake Day

SONY DSC

Ok, so I know it’s not for a few days yet, but it pays to be prepared. Here are a few of my favourite batter recipes. (All serve 2, generous portions)

Basic Pancake Batter (also great for Toad-in-the-Hole)

4 oz plain flour

1 egg

1/2 pt liquid (2/3 milk, 1/3 water)

Put the flour in a bowl, break in the egg and begin to mix, slowly adding the milk/water until it forms a smooth batter. Keep adding the liquid until it’s all used up, beating well all the time. You can use it straight away, or let it stand for a while, it’s up to you!

Eggless Pancake Batter

I discovered this one the other day, when I wanted to make toad-in-the-hole but had no eggs. This is often considered the vegan alternative, as you are supposed to use soy milk. I think this works just as well as the basic recipe above. I found the original recipe here and have converted it to imperial, and halved it. I orginally made the full recipe, realised I had way too much, and left half in the fridge. I made pancakes with the left-over batter the next day and it worked really well. I have since made pancakes with fresh batter and found it didn’t work so well. So the moral of the story is, it keeps fine for 24-48 hours, and it’s probably best to let it stand if you’re making pancakes!

1.5 oz melted butter

5 oz plain flour

1 tsp baking powder

1/2 pt milk

Put the flour and baking powder in a bowl, add the butter and a little milk until it forms a smooth batter, then slowly add the rest of the milk, beating well.

Cornmeal Pancakes

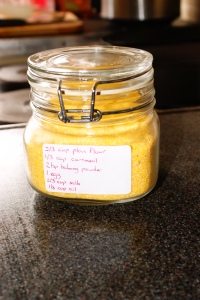
My cousin introduced me to this recipe, and I LOVE it for making drop pancakes. In fact, I love it so much I have the recipe stuck to my jar of cornmeal. In the UK, this is called polenta, and can be found in the supermarket with the lentils and pulses. I’m afraid the recipe I have is in cups, if anyone has a problem with this, let me know and I’ll try and convert it for you!

2/3 cup plain flour

1/3 cup cornmeal

2 tsp baking powder

1 egg

2/3 cup milk

1/8 cup oil

As previous recipes, put the dry ingredients in a bowl, and slowly add the liquid, mixing well the whole time. Beat thoroughly before cooking.

Happy flipping!!

Really Cheesy Cheese Scones

SONY DSC

First of all, you may have noticed that up to this point, all my recipes are in Imperial weights. This is because I have my Granny’s old weighing scales, with a slider balance thingy… It has meant that I have had to (at times, inaccurately) convert every recipe I use that is in Metric. Well, no longer! I received an electric weighing scales for Christmas, so I can now use recipes in the format they are meant to be. Here is my first recipe in grams.

500g self raising flour

1 tsp baking powder

250g strong cheese (I used half mature cheddar, half Stilton)

3 tbsp oil

125ml milk

1 egg

Mix the flour, baking powder and cheese together in a bowl. I had some Stilton left over from Christmas (we don’t like it much, but it’s good for cooking, makes some amazing macaroni cheese!) and combined it with mature cheddar.

Measure your milk in a jug, then add the oil and egg. Pour it into the flour mixture, and mix well, a metal spoon or knife is best, as the mixture won’t stick as much as it would to a wooden spoon. The mixture should form up into a dough, but you don’t want it too dry. It should be a bit sticky. Add more milk if needed.

Flour your worktop well, and dump the dough out onto it. Press the dough out with your hands, then fold it over once and spread again, until it is about 1 – 1 1/2cm thick. Cut out into rounds, either with a round cutter or the top of a glass. I got about 16 out, but I did throw a bit of the dough away. Place them onto a baking sheet (they won’t spread much, so they can touch) and bake at 180°C for about 20 minutes.

They should be golden brown on top and break open easily. (The fold-over is the trick here.) Best eaten warm from the oven, while the cheese is still melty.

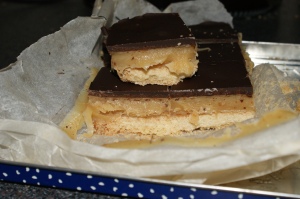
Millionaire’s Shortbread

SONY DSC

I love this stuff, but have always struggled to get the caramel filling right, and end up with it oozing out and the chocolate sliding off the top. I found this recipe in a magazine, and altered it to work with my imperial scales! I apologize for the random mix of imperial and metric, the stuff I need to measure has to be in imperial, but the stuff which requires a whole tin or packet is in metric ’cause that’s the way it’s labelled up!

For the shortbread base:
1 1/2 oz sugar
5 oz butter (use real butter, not margarine)
6 oz plain flour
1 oz rice flour

You can either dump all the ingredients in the food processor, whizz it until it looks like fine breadcrumbs, then gently knead it into a soft dough. Or, you can mix the dry ingredients in a bowl, rub in the butter and then knead into a dough. Whichever way you choose, once the dough is formed, press it gently into a a square (about 9×9″), lined tin to make an even base. Prick the shortbread well with a fork and then bake at 160°C for about 35 minutes, or until golden brown. Remove it from the oven and set aside to cool. Meanwhile…

For the caramel filling:
6 oz butter
6 oz sugar
4 tbsp golden syrup
1 397ml tin condensed milk

Place all ingredients in a pan and heat gently, stirring often, until the butter and sugar has melted. Turn up the heat until it begins to bubble gently (NOT a rolling boil!). Stir constantly for 5 – 8 minutes, until it starts to get thick and fudgy. At this point, you will be stirring up brown bits from the bottom of the pan. Don’t panic!! This is where the sugar is catching a little. As long as you keep stirring to prevent burning, it will be fine. The brown bits will stir in and by the time it’s cooled and set they will have disappeared. Once you think it’s thick enough, pour it over the shortbread base and put it in the fridge to set for a few hours.

Once the caramel has cooled and set, it’s time for the chocolate topping. I used plain chocolate, which is traditional, but I think maybe half plain half milk would also work. You don’t really want all milk as it would just be far too sweet.

For the topping:
300g plain chocolate (or 10 1/2 oz!)

There are a few different ways of melting chocolate. If you have a microwave, break the chocolate into a heat-proof bowl and nuke for 20 – 30 seconds. If, like me, you don’t have a microwave, you can do it the old-fashioned way. There are 2 ways of doing this. So many choices! The proper way is to half-fill a pan with boiling water, then place a bowl (ideally pyrex) over the top of the pan so the water doesn’t touch the bowl. Put the chocolate in the bowl and stir occasionally until it’s all melted. Personally, I think this is an awful lot of messing about. I use a small plastic bowl and set it in a pan of boiling water, stirring until the chocolate has melted. As long as you don’t let it burn, any of these methods get the job done!

Spread the chocolate over the caramel and return to the fridge to chill. Once the chocolate has hardened, turn out onto a board and cut into squares. I got 16 pieces from mine, but you really wouldn’t want more than one piece at a sitting. Please enjoy responsibly!!

Red Cabbage Coleslaw

SONY DSC

Yesterday I made a red cabbage coleslaw, which is really colourful, tastes amazing, and is so easy to personalise! There is no correct recipe, it’s all down to personal taste and what’s available. I’ll tell you how I made mine, and give you a few suggestions so you can make make it your way.

1/2 red cabbage

1 carrot

1 eating apple

2 or 3 tbsp mayonnaise

1 handful sultanas

The cabbage was from my neighbour’s garden, so I took a couple of outer leaves off, checked for bugs, and gave it a quick wash. Then I ran it thought the grater on my food processor. I only have one grater attachment, which is fairly fine, but I like that as it means the coleslaw’s not too chunky, and I think the colours blend better. Next, I topped and tailed a medium carrot and sent it after the cabbage. Then I quartered and cored an apple and sent that the same way! At this point, it’s up to you what proportions you want. I think it could have easily taken more cabbage. Put the grated veg into a bowl and mix it so that everything’s jumbled up. Add a couple of tablespoons of mayonnaise and stir it in. You need just enough so that it works through all the vegetables and coats it. You don’t want too much or it’ll go soggy. I added about a handful of sultanas at this point, just to make it that bit more exotic! Chopped walnuts or pecans would also go well. You could head down the Waldorf Salad direction and add diced celery too. Now, I like raw onion, but it doesn’t like me very much, so I kept this onion free. On tasting it, my husband did say it seemed to lack a little something. Just a little bit of shredded onion, red or white, or some finely chopped spring onions would really help fill out the flavour. Again, that’s personal choice, it was really good without the onion, but if you like onions, throw some in!!

This makes a great side dish, as you can see, I served it with burgers, but it would go with pretty much anything. It is so much fresher and more colourful than the little tubs of bought coleslaw, and so quick to make, I don’t think I’ll ever buy it ready-made again!

Baked Potatoes Slow Cooker Style

SONY DSC

As I am usually too hungry and impatient to wait an hour or 2 for my tea after getting home from work at night, baked potatoes weren’t often on the menu. Then I researched how to do them in the slow cooker, and prefer this method every time! The picture shows a sweet potato, but the method works exactly the same for regular potatoes.

Give your potatoes a quick scrub if necessary, then score or prick them and wrap them individually in foil. Place them in the bottom of the slow cooker and cook on low for 6 – 8 hours. The time needed depends on the size of the potato. You can also cook them on high for 3 – 4 hours.

Our favourite way of eating baked potatoes is smothered in tuna mayo, cheese and baked beans. Very unhealthy, but so good!! They are also great served with chili and a dollop of sour cream.

Cinnamon Cravings

This morning I really fancied something sweet, cinnamonny and bread-based. I briefly considered cinnamon rolls, but while they are delicious, they take a bit of making, and when faced with a tray of them, I just have to eat them. I did a quick search for some cinnamon bread, and came across this recipe. I have just made and tasted a loaf of this bread, and I highly recommend it. I would suggest that you go with the thinly rolled, extra cinnamon sugar option though!!


Homemade Cinnamon Swirl Bread – Pinch of Yum